


AWS Amplify announced server-side rendering support here, which means we can fully utilize Next.js server-side rendering.
In this article you would build a user store app that shows you a list of users, you'll utilize Next.js server-side rendering to get up-to-date data, create an API route, consume that endpoint, and deploy it on AWS Amplify.
AWS Amplify supports all the Next JS features so this is a great hosting choice for us.
The code for this project can be gotten from https://github.com/inaju/userstore
If you're only interested in deploying your Next.js app on Amplify kindly fork and clone the repo and head to the Deploy to AWS Amplify section
Why AWS Amplify?
AWS Amplify is a service that helps us build and deploy applications very quickly without concerning ourselves with a more complex infrastructure setup. Amplify lets you add things like Storage, Authentication, Monitoring, and PubSub functionalities easily while letting you focus on getting your product live.
Amplify supports Next.js, and you'll get to enjoy:
Faster builds. You should expect 3x build speed when deploying.
Amazon CloudWatch integration. Logs are sent to CloudWatch to enable you to monitor and observe your application.
Fully managed hosting infrastructure reduces operational overhead for development teams, with fewer resources to manage in your AWS account. To learn more about pricing visit https://aws.amazon.com/amplify/pricing/.
Prerequisites
Create an AWS account if you haven't.
Next.js 13 is installed on your machine.
Vs Code Installed (Optional)
Create Next JS app
Let's start by creating a next JS app
If you use npm please copy this into your terminal
npx create-next-app@latest userstore --typescript --eslint
or yarn
yarn create next-app@latest userstore --typescript --eslint
you should be prompted with some questions on the CLI, something like this

When your package managers are done installing open the project in vs code using these commands
cd userstore
. code
We need dummy user data that would give us basic details about a user like first name, last name, age, location, profile image etc, for this project we'll be using dummy user data from https://randomuser.me/
Create a usercard component
This component would be in charge of displaying single-user data
Create a component folder with a usercard.tsx file
// usercard.tsx
import { Result } from '@/pages'
import Image from 'next/image'
import React from 'react'
const UserCard = (props: Result) => {
return (
<div
key={props.id.value}
className='bg-black/[0.05] hover:bg-black/[0.09] hover:shadow-2xl hover:cursor-pointer p-4 rounded-lg shadow-xl w-full lg:w-[620px]'>
<div className='flex flex-col lg:flex-row justify-between items-start md:items-center'>
<div className='flex gap-2'>
<Image
src={props.picture.medium}
priority
className=' rounded-full border-teal-400 border-2'
width={50} height={50} alt={`image for ${props.name.first}`} />
<h3 className='text-[2rem] text-neutral-700 mr-3'>
<>
{props.name.first} {props.name.last}
</>
</h3>
</div>
<p className='mt-2 md:mt-0 bg-white w-fit h-fit px-4 rounded-full text-green-500'>• Available</p>
</div>
<div className='mt-4 border-red-300'>
<div className='flex gap-8 text-neutral-500'>
<p className=''><b>
Phone: 
</b>
{props.cell}
</p>
<p> <b>
Age:  
</b>
{props.dob.age}
</p>
</div>
<p className='mt-1 text-neutral-500'><b>Location:</b> {props.location.city}, {props.location.country}</p>
<p className='mt-1 text-neutral-500'><b>Gender:</b> {props.gender}</p>
</div>
<div className='bg-teal-400 p-2 px-4 rounded-lg w-fit mt-4 hover:cursor-pointer hover:bg-teal-300 text-white '>Hire User</div>
</div>
)
}
export default UserCard
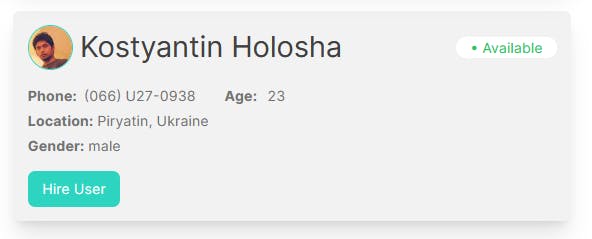
It should look something like this on your browser
Create a types folder and an index.tsx file and paste this into the file
export interface IData {

  data:
  {
    results:
    Result[]
  }
  info: Info
}

export interface Result {
  gender: string
  name: Name
  location: Location
  email: string
  login: Login
  dob: Dob
  registered: Registered
  phone: string
  cell: string
  id: Id
  picture: Picture
  nat: string
}

export interface Name {
  title: string
  first: string
  last: string
}

export interface Location {
  street: Street
  city: string
  state: string
  country: string
  postcode: number
  coordinates: Coordinates
  timezone: Timezone
}

export interface Street {
  number: number
  name: string
}

export interface Coordinates {
  latitude: string
  longitude: string
}

export interface Timezone {
  offset: string
  description: string
}

export interface Login {
  uuid: string
  username: string
  password: string
  salt: string
  md5: string
  sha1: string
  sha256: string
}

export interface Dob {
  date: string
  age: number
}

export interface Registered {
  date: string
  age: number
}

export interface Id {
  name: string
  value: string
}

export interface Picture {
  large: string
  medium: string
  thumbnail: string
}

export interface Info {
  seed: string
  results: number
  page: number
  version: string
}
your global.css file should look like this
@tailwind base;
@tailwind components;
@tailwind utilities;
Configure your next.config.js file to allow images from randomuser.me, the file should look like this
/** @type {import('next').NextConfig} */
const nextConfig = {
  reactStrictMode: true,
  images: {
    remotePatterns: [
      {
        protocol: 'https',
        hostname: 'randomuser.me',
      },
    ],
  },
}

module.exports = nextConfig
Serverside Rendering
What is Server Side Rendering in Next.js?
This is a rendering method in Next.js as a way of pre-rendering a page from the server on request ie: A server-rendered page will show the latest data. This is useful for improving SEO performance.
To enable this we need to export an async function called getServerSideProps. This function would be called and return some data by the server on every request.
On your index.tsx file make these changes.
// index.tsx
import { Inter } from 'next/font/google'
import UserCard from '@/components/usercard'
import { IData, Result } from '@/types'

const inter = Inter({ subsets: ['latin'] })

export default function Home({ data }: IData) {

  return (
    <main
      className={` flex flex-row flex-wrap mx-auto  max-w-[1324px] p-4 gap-y-8 gap-x-8  h-full justify-between ${inter.className}`}
    >
      {data.map((item: Result, index: number) => (
        <div key={index}>
          <UserCard {...item} />
        </div>
      )
      )}
    </main>
  )
}


// This gets called on every request

export async function getServerSideProps() {
  // Fetch data from external API

  const res = await fetch(`https://randomuser.me/api/?results=10`)
  let data = await res.json()
  data = data.results
  // Pass data to the page via props
  return { props: { data } }
}
Run your server with the yarn dev command, you should see this on your browser

Setup API Routes
Next.js enables developers to build REST APIs or GRAPHQL. The api folder is located in the pages directory and all folders and files would be mapped to an api endpoint instead of a page ie pages/api/getuser.ts would be mapped to /api/randomuser
Let us create a randomuser.ts file inside the pages/api directory, which should look like this
// Next.js API route support: https://nextjs.org/docs/api-routes/introduction
import type { NextApiRequest, NextApiResponse } from "next";

export default async function handler(
  req: NextApiRequest,
  res: NextApiResponse
) {
  const response = await fetch(`https://randomuser.me/api/`);
  let data = await response.json();

  res.status(200).json({ data });
}
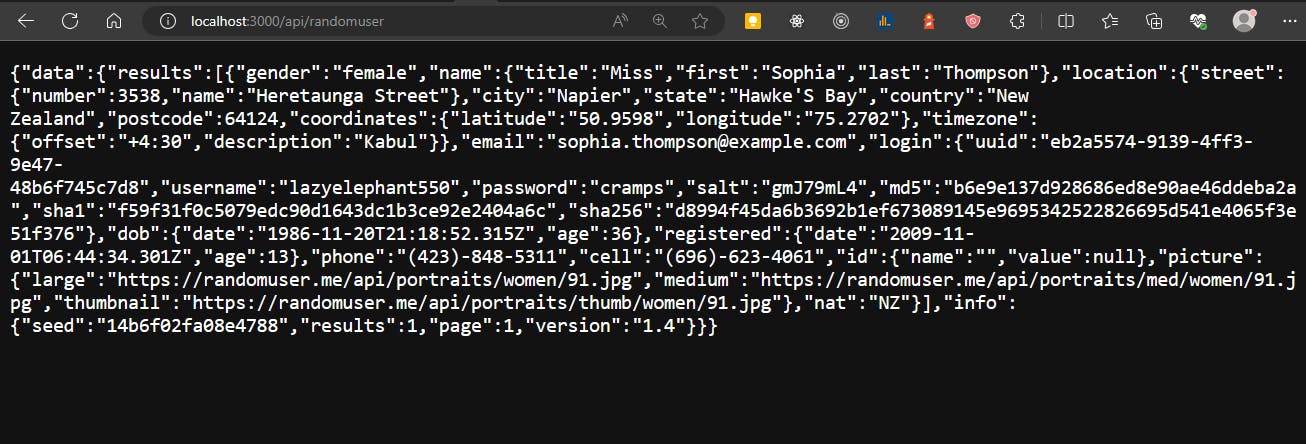
This file returns a random user from the external API, so when you call the endpoint /api/randomuser you would get a random user details.
You can test this api, by navigating to localhost:3000/api/randomuser on your browser, you should have this json response on your browser
Let's get a page to consume this endpoint
Create a singleusers folder with an index.tsx file inside the pages folder, so you should have a file that looks like this
import React, { useMemo, useEffect, useState } from 'react'

const SingleUser = () => {
    const [resData, setResData] = useState<any>()

    const fetchName = useMemo(async () => {
        if (global.window) {
            const response = await fetch("/api/randomuser")
            const data = await response.json()
            if (data.error) {
                setResData({ resData: "Please try again later" })
            }
            setResData(data)
        }
    }, [])

    useEffect(() => {
        fetchName
    }, [fetchName])

    return (
        <div>
            <p>
                hey there  {resData?.data.results[0].name.first}   {resData?.data.results[0].name.last}
            </p>
            <p>
                you are   {resData?.data.results[0].dob.age} years old
            </p>
        </div>
    )
}

export default SingleUser
This file calls the endpoint you just created and displays it, the useMemo hook was used so that the function doesn't get called multiple times and it's inside a useEffect hook so that it calls the endpoint only once on page load.
Navigate to http://localhost:3000/singleuser on your browser, you should see this

Deploy to AWS Amplify
Amplify Hosting supports all Next.js features. Let’s go over the steps to for deployment.
Step 1: Push to git
To push to git run the following commands in your terminal
git add .
git commit -m "worked on the basic features"
git push origin main
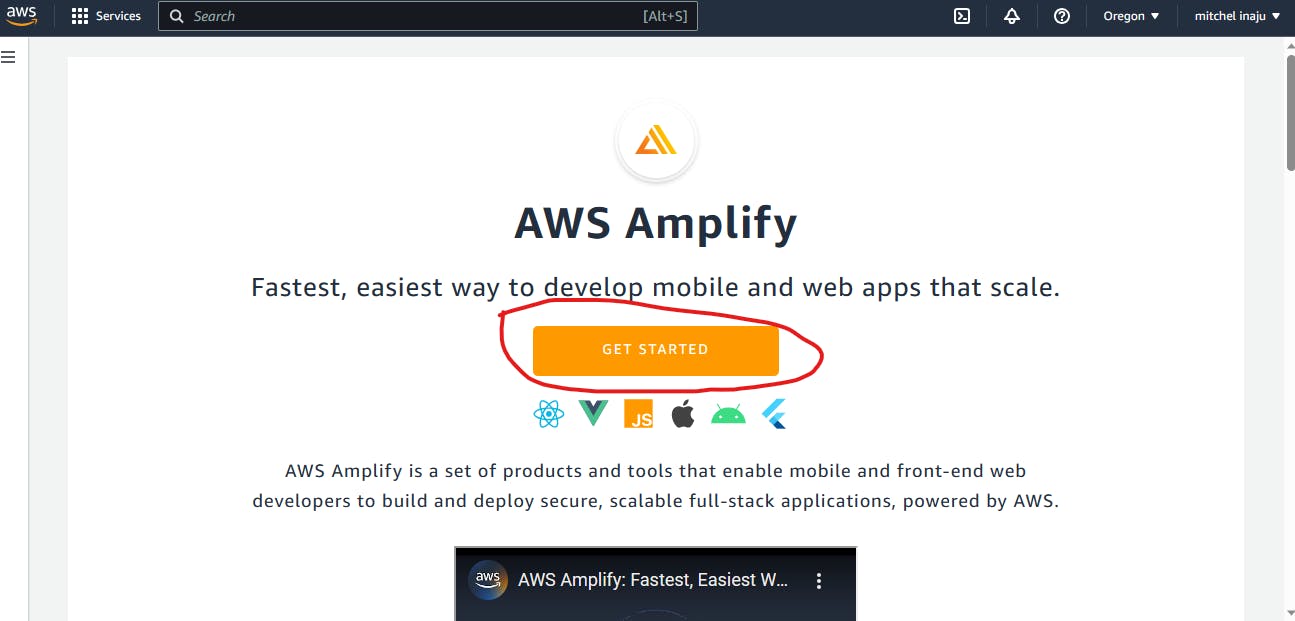
Step 2: Create Amplify App
Navigate to the Amplify Console to create your amplify app, click on the get started button.
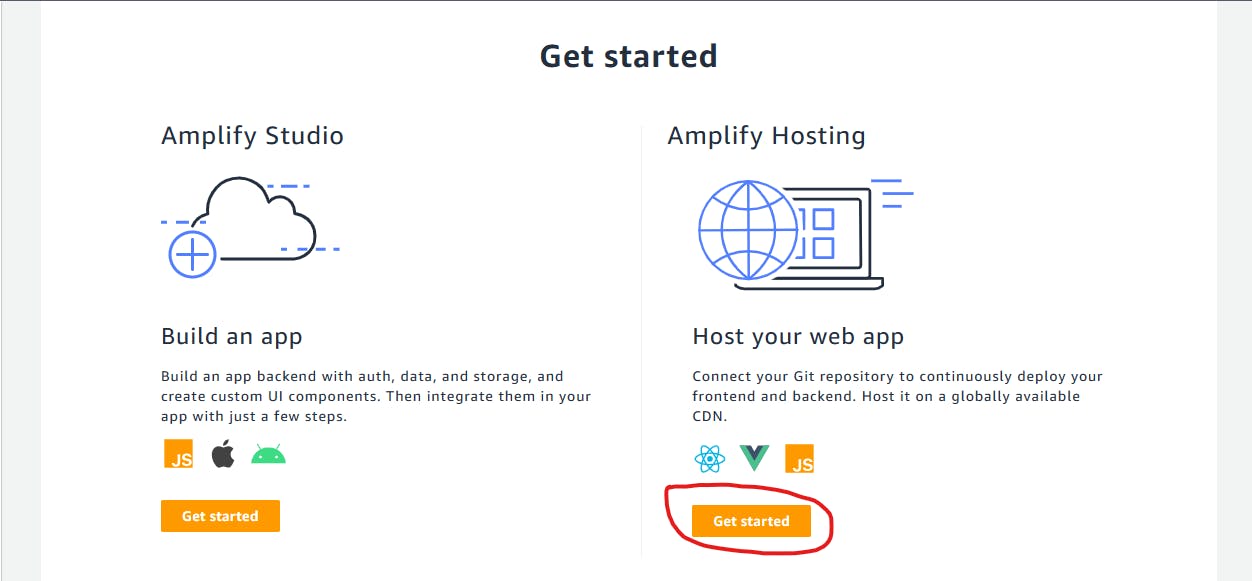
It would take you to another part of the same page, click on Get started
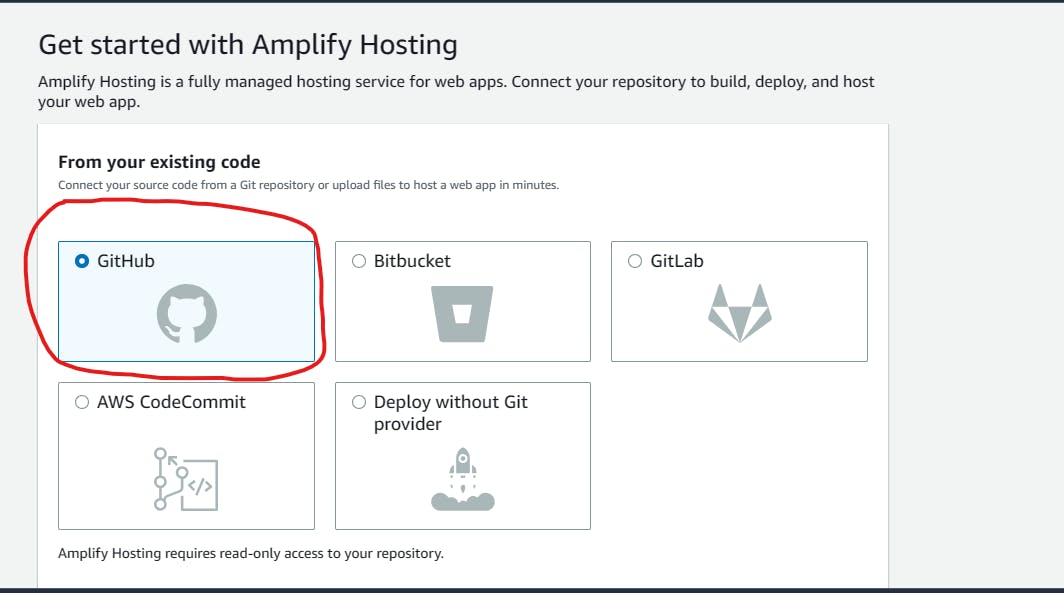
Step 3: Select your git provider
For my case, I used GitHub, so I'll select GitHub
You'll be prompted to allow AWS Amplify Console have permission to your github, click on the green button.
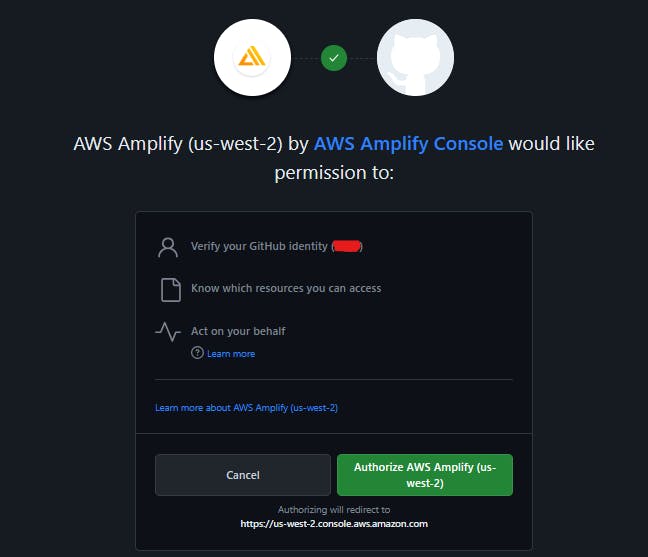
Then click on Continue on your aws console
Step 4: Select your repository and branch

Select your repository and ensure that the right branch is selected, since we created ours on the main branch, we can leave it on the main branch.
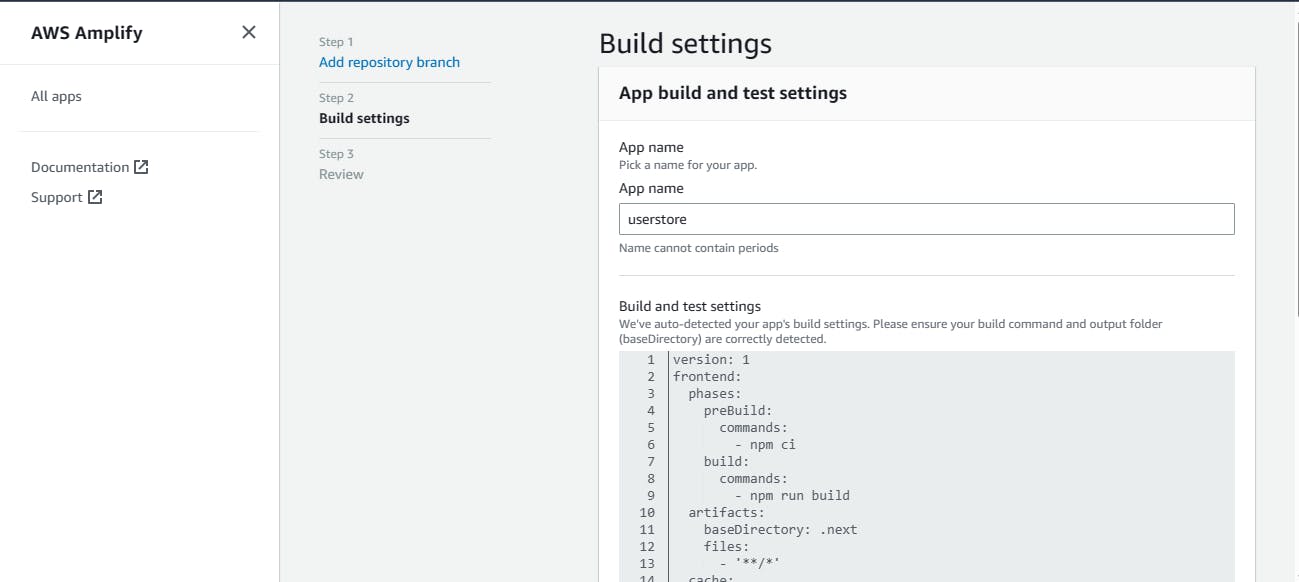
Step 5: Build Settings page
The next page is the build settings page, Amplify automatically detects the optimal settings so there's no need to change the file, so leave it that way and click next

Step 5: Deploy your app
On the review page, we can see that it automatically detects that we have SSR functionality, click Save and Deploy

Your app has been created and Amplilify Hosting will provision an isolated build and hosting environment for your project and deploy it.
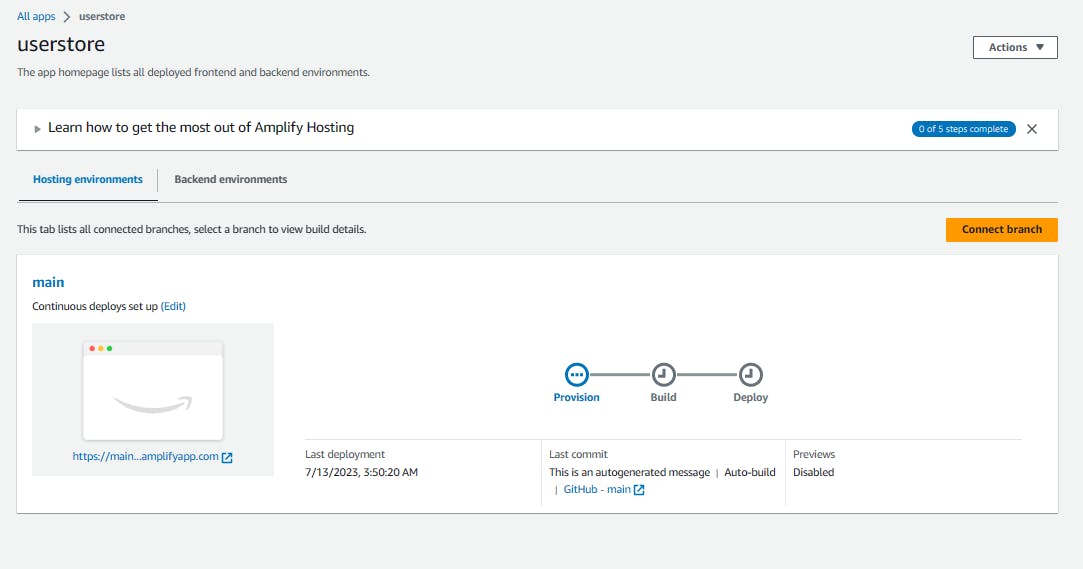
When the deployment has been completed, click on the provision, build or deploy to get to the build summary page, then click on the Domain Link.
Conclusion.
You've been introduced to Next.js server-side rendering, Next.js API routes, and how to handle deployment on AWS Amplify.
If you found this article helpful please like or leave a comment, share it with your friends/network who might need this, and connect with me on Linkedin, Twitter, and Dev.to.